WordPress 5.0 officially launched its own editor “Gutenberg” on November 27, 2018. It changes the way you create pages and posts and everything on your blog or website. Creating a custom Gutenberg block from scratch needs extra skills like Webpack, React, Babel, ESNext or ES5, and much more. Thanks to Advanced Custom Fields (ACF), now you can create your own block with little knowledge of code. This feature is included in paid ACF since version 5.8. In this post, we’ll discuss how it works and how to do it step-by-step.
Let’s get started.
How does the Gutenberg Block work with ACF?
First of all, you need to register a block in PHP instead of React. It’s good news for WordPress Developers who aren’t familiar with React. But, I’d say you should learn React because core blocks are better in many ways. On the other hand, ACF blocks are easier to build and you can create inputs for your block from the WP Admin Panel.
Benefits of Gutenberg Block with ACF
- Simpler Learning Curve: If you’re already familiar with PHP and WordPress, using ACF is straightforward. No need to learn React.
- Quick Development: ACF allows for rapid prototyping and deployment. You can create blocks with just a few lines of PHP code.
- Backend Logic: Easier to integrate with WordPress backend logic and PHP functions, as you’re working in the same language ecosystem.
- Lower Complexity: No need to deal with JSX, ES6, or other JavaScript complexities. This can make maintenance easier.
- Admin UI: ACF provides a user-friendly admin interface for adding custom fields, reducing the need for custom backend development.
- Legacy Compatibility: Easier to integrate with older themes and plugins that might not be React-ready.
- SEO: I’m not an SEO but because the content is generated on the server side, it might have some SEO advantages over client-rendered React components.
- Less Dependencies: You avoid adding extra libraries and packages, making your project lighter.
- ACF’s Ecosystem: Access to a wide range of field types and extensions that ACF provides out of the box.
- WordPress Integration: Native WordPress hooks and filters can be used more seamlessly.
While ACF has these advantages, it may not offer as much flexibility and interactivity as React-based blocks. You should choose based on the project needs.
Step-By-Step Guide
1. Install ACF Pro
As this feature is in pro version of advanced custom fields so ensure to install and activate ACF Pro.

2. Block Registration
Next, you need to register a custom block, like how we registering post types. You’d use acf_register_block_type() function to register custom block types in your functions.php file (or any other file and then include it in functions.php.
<?php
add_action('acf/init', 'riz_acf_blocks');
function riz_acf_blocks() {
    acf_register_block_type( array (
        'name'              => 'cc_proposition',
        'title'             => ('Proposition'),
        'description'       => (''),
        'render_template'   => 'inc/proposition.php',
        'category'          => 'design',
        'icon'              => 'admin-post',
        'keywords'          => array( 'proposition' ),
    ) );
}
?>
In the above code, we are initializing our function using acf/init hook. And then registering our block using “acf_register_block_type()” function. After setting up the function pass the array and set parameters for your block. Make sure “name” should be unique for each block.
3. Create Custom Fields
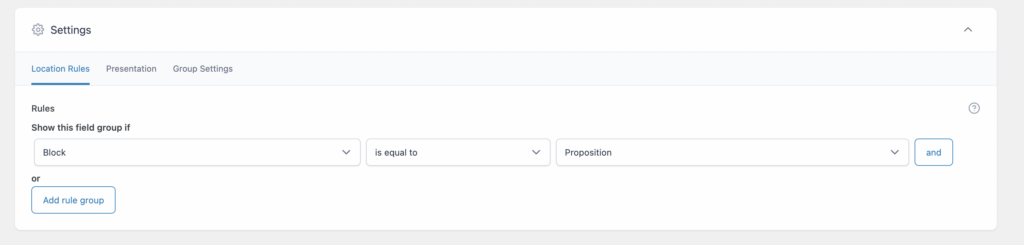
Now, create a new custom field groups from WP Admin panel and make sure to select the field group’s Location is set to “Block” and then select the block that we registered in functions.php (“Proposition” in this example):
Next, you’d add the fields as if you do normally.
4. Block Rendering
Create the file that we passed to “render_template” parameter while registering the block in functions.php (inc/proposition.php in this example). You can rename or relocate this file anywhere in the theme, just make sure to give the right path of your template in the Block Registration function. Now paste the following code in your template:
<?php $id = 'proposition-' . $block['id']; ?>

<?php if ( have_rows( 'single_repeater_proposition_gb' ) ) : ?>
<section id="<?php echo esc_attr($id); ?>" class="section proposition-section">
<div class="container">
    <div class="particle-overflow">
        <h2><?php the_field( 'heading_proposition_gb' ); ?></h2>
        <?php while ( have_rows( 'single_repeater_proposition_gb' ) ) : the_row(); ?>
            <div class="single line-box">
                <div class="line-circle"></div>
                <p>
                    <strong><?php the_sub_field( 'title' ); ?></strong><br/>
                    <?php the_sub_field( 'description' ); ?>
                </p>
            </div>
        <?php endwhile; ?>
    </div>
</div>
</section>
<?php endif; ?>
5. Add Style
Add style in your theme/plugin css files.
<style>
.proposition-section {
    margin: 50px 0;
}
.proposition-section .container {
    background: #021B59;
    padding: 107px 120px 50px;
    overflow: hidden;
    position: relative;
}
.particle-overflow {
    position: relative;
    z-index: 9;
}
.section h2 {
    font-family: 'Proxima-Nova-Black';
    font-size: 48px;
    color: #ffffff;
    text-align: center;
    margin-bottom: 70px;
}
.section p {
    font-family: 'Proxima-Nova-Medium';
    font-size: 18px;
    font-weight: 500;
    line-height: 40px;
    color: #ffffff;
}
.line-box {
    padding-left: 30px;
    margin-bottom: 50px;
    position: relative;
}
.line-circle {
    width: 2px;
    background-color: #ffffff;
    height: 88px;
    position: absolute;
    left: 0;
    top: 10px;
}
.line-circle::before,
.line-circle::after {
    content: '';
    width: 6px;
    height: 6px;
    background: #ffffff;
    position: absolute;
    border-radius: 100%;
    top: -5px;
    left: -2px;
}
.line-circle::after {
    top: 100%;
}
.line-box p strong {
    font-family: 'Proxima-Nova-Bold';
    border-bottom: 1px solid #ffffff;
    text-transform: uppercase;
}
</style>
Or you could also just add these styles as separate file and include in functions.php like this:
function theme_enqueue_styles() {
wp_enqueue_style('block-css', get_template_directory_uri() . '/path/to/block.css');
}
add_action('wp_enqueue_scripts', 'theme_enqueue_styles');
Final Result
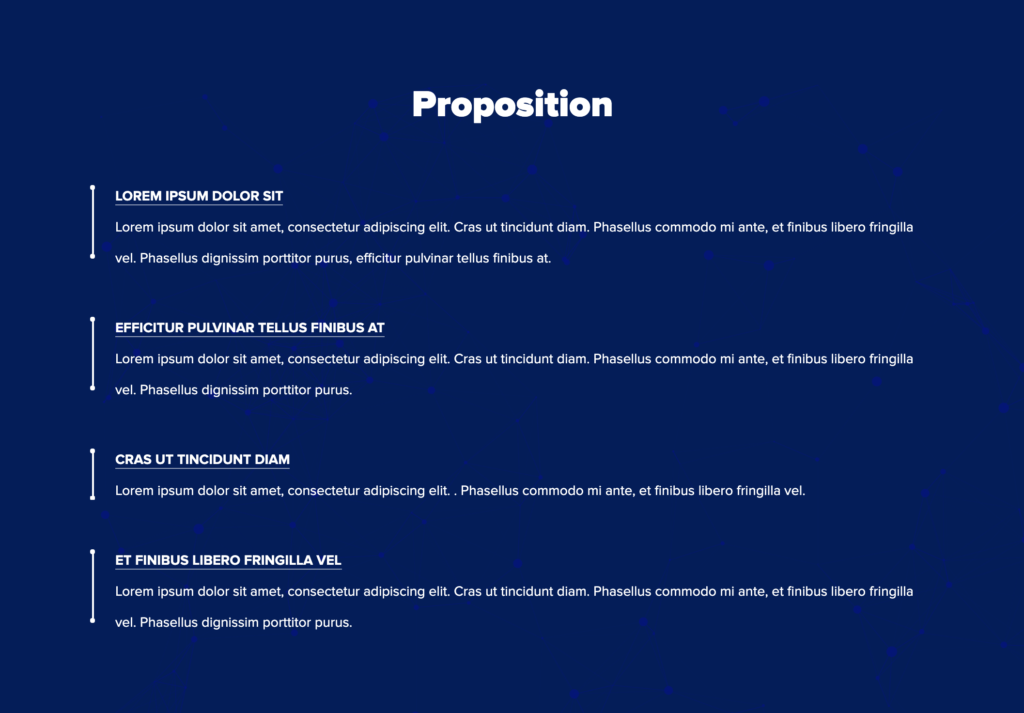
That’s it! Now just add this block to any of your page/post and see for yourself:
That’s it! You’re now equipped to create custom Gutenberg blocks using ACF, minus the fuss of diving into React. Whether you’re a seasoned WordPress developer or new to the game, this approach simplifies your workflow and gets you quicker results. Now go ahead, add this block to your WordPress arsenal and see the magic for yourself.
Happy coding!