If you’re an old school developer like me, you probably prefer setting up server yourself. LEMP Stack is my go-to stack for a Web Server. And we all love the good old PHPMyAdmin for database administration. So, in this article I’ll show you how to install LEMP Stack and PHPMyAdmin on a Ubuntu VPS.
Things we’ll install:
PHP 8.3 (with PHP-FPM)
NGINX
MySQL Server
PHPMyAdmin
Composer
Node + NPM
And finally a free SSL from Let’s Encrypt via CertBot
If you’re looking for commands / code only and don’t have time to read this article, you can find it on this secret gist I made.
1. Prerequisites
The first thing is to make sure your package repos are up to date, for that run this:
apt update
This will update your VPS’ packages list.
Next, upgrade your packages that are pre-installed:
apt upgrade
If you’re running Ubuntu 24.04 LTS or later, you can skip this step. For Ubuntu 22.04 LTS or older, you also need to add Odrej’s PHP repository with this:
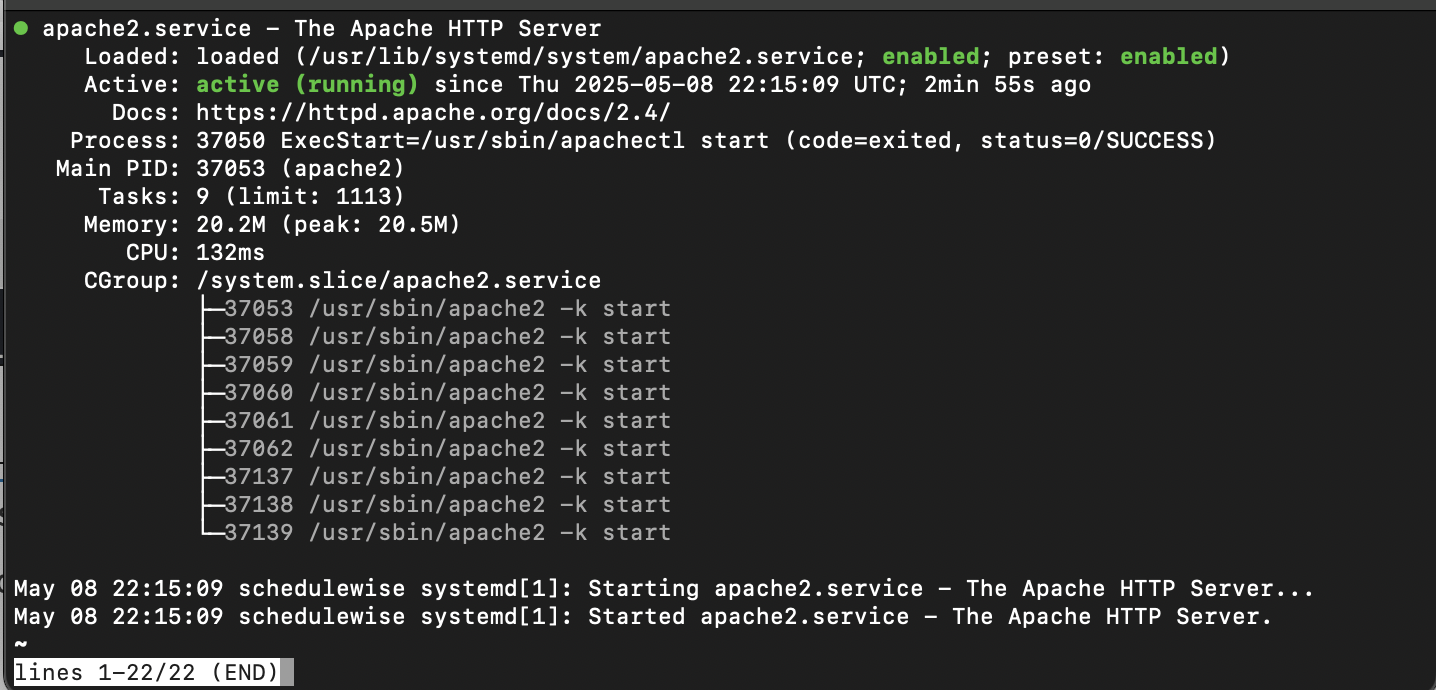
Update 9 May 2025: I was just installing LEMP on a client server and saw that the server was pre-installed with Apache (or maybe php installed it, unsure). Either way, be sure to run this command: systemctl status apache2
If it says that Apache is “active”, like this screenshot:
Then you need to run these commands before installing NGINX:
systemctl stop apache2
systemctl disable apache2
If it doesn’t, just ignore this update note and continue…
Update 28 June, 2025: While setting up the server for another client today, I figured out and updated the commands accordingly, this is no longer an issue.
3. Installing NGINX
Once we’ve installed php8.3, we’ll now install NGINX:
apt install nginx
4. Enable Firewall
On most VPS, and on all the droplets of DigitalOcean, UFW (or Uncomplicated Firewall) is pre-installed. You just need to configure and enable it. Since our server will only be running a web server (port 80 and 433) and we’ll need SSH access to it as well (port 22), you need to allow these ports by running the following commands:
ufw allow 80
ufw allow 443
ufw allow 22
These will allow traffic on port 80, 443 and 22. Next, run this command to enable the firewall:
ufw enable
5. Install MySQL and PHPMyAdmin
Run this command to install MySQL server:
apt install mysql-server
Once the MySQL server is installed, it’ll ask you to run mysql_secure_installation but you shouldn’t right away. Securing MySQL Installation can lead to password validation issues when installing PHPMyAdmin, so once the MySQL Server is installed you should install PHPMyAdmin:
apt install phpmyadmin
During installation it’ll ask you to select your web server and the list would contain “Apache2” and “lighttpd”. Since we’re using NGINX, you can skip this step by just hitting “enter”.
Next, it’ll ask you to “Configure database for phpmyadmin with dbconfig-common?”. Here you need to select “Yes”. And on the next screen, where it’ll ask you to enter a password, just hit “enter” with empty password, the installation will generate a password on it’s own.
Now you can run this command to secure installation:
If this is a staging/test server, you might want to uncomment the auth_basic code from line 21 and 22. And make sure the auth user file exists, by running this command:
sh -c 'printf "username:%s\n" "$(openssl passwd -6)" > /etc/nginx/.htpasswd'
This will ask you to enter password, then confirm password and then save the .htpasswd file.
Once you save the site config in /etc/nginx/sites-available/yourwebsite.com you’ll now link it to Enabled Sites:
Setting up a server yourself can be daunting, especially if you’re new to DevOps. You can run into PHPMyAdmin not installing due to “Password does not satisfy the current policy requirements”, Conflicting Node/NPM versions etc. or so many other errors. So, over the years, I’ve perfected the solution that I wrote in this article. We installed PHP 8.3, NGINX, MySQL, PHPMyAdmin, SSL, Composer and NPM using the leanest way possible.
If you have any questions or run into issues, feel free to reach out. Happy coding!
How we reviewed this article:
Content Process
My process of publishing articles include:
I get an Idea
Get feedback from fellow developers if they want a detailed post on it
Research existing blog posts to see if there's a well written article on it
Write the post
Get feedback from colleagues, improve and publish!